Showing posts with label How To. Show all posts

Tuesday, 11 April 2023

Five Ways to Get Rid of Out of Control Manes

 Aaaa haired model horses, beautiful, majestic, so realistic and yet SO ANNOYING! We've all been there, that one model whose mane just WILL NOT BEHAVE! That model who gets to a show and looks like they've sat on an electric fence. I feel your pain. But do not fret! Here are my top five ways to sort out those pesky manes.


1. Toothbrush Time

The most effective way to groom manes and tails is using a toothbrush. Choose one with a flat head as this will allow you to smooth the hair out (as apposed to those weird fancy ones that are all wiggly).

You can combine this with other techniques to help smooth a mane. It is a good idea to keep a toothbrush in your show kit as a last minute solution to any loose hairs in the show ring.


2. Water

Your first go to for taming manes is going to be water. This is the most gentle thing to put on your horse and will be the least damaging item to use.

Apply the water to your toothbrush to get it damp, them smooth down the mane to get it to sit where you want. You can combine with clingfilm to help 'set' the mane in place.

3. Dry Shampoo

Dry shampoo is by far the best product I've ever found to sort out manes! I started to use it many years ago to help deal with Equorums which are by far the worst manes I've ever had to deal with on my haired models.

Like the water you don't apply it directly to the horse. Instead spray it onto your toothbrush and then use these to brush the mane and tail. It is less liquid than water and so causes less dampness if you then wrap the mane to set.

This is the one I use. There is no special reason for this other than I already owned it when I decided to try and have used the same can ever since!


4. Cling Film

Cling film is used to 'set' manes and tails in place. It works best if the mane is slightly damp before you wrap it. Once dampened into place wrap the mane (or tail) in cling film to hold it in place. Leave on for a few days before removing (the easiest method is to do it before you pack the horse for a show and then remove it for the show day)

Here is a before and after of a horse that had its forelock wrapped. You can see in the first picture it's a bit all over the place whilst in the second it is sat beautifully.


5. Aggressive Grooming

The final technique is a bit of a weird one but it is the only way to deal with Equorum manes and tails! Especially those horrid tails. This is the best method for over haired horses or ones who have had products such as gel or styling foam added and need this brushing out.

Lay the horse on your lap and then get a small hair brush (you want one that doesn't have teeth but has a softer finish). Vigorously brush out the tail onto your leg, don't touch the horse with the brush to prevent damage! This will brush out all of the knots. You may want to keep some extra mohair to hand to repair any lost hairs.

You can use the same technique with longer manes as well.

Once done use a toothbrush and dry shampoo to shape and style, adding more hair if needed.

You can see the difference in this Equorum,, his tail is now a lot neater. It was also wrapped at the top with cling film to create a nice finish.


Saturday, 18 February 2023

How do you turn a mini whinnie into a necklace?

 Mini whinnie necklaces are one of the most fun things you can make with your model horses. Not only are they a creative way to use your minis but they also look gorgeous as well.

Turning a mini whinnie into a necklace is a relatively simple process, here is a quick step by step guide so that you can have a go.

Supplies Needed

🐴 Mini Whinnie Model Horse
🐴 Wire
🐴 Necklace Chain

Advanced option:

🐴 Sheep Eye Nail
🐴 Dremel with small drill bit
🐴 Glue

We are going to go through two methods in order to create your necklace. Either method works well, although the advanced option gives you a nicer finish.

Basic Method

The first thing you will need to do is ensure your mini whinnie is clear and, if you want, paint your model to a new colour.

We are going to be using this little mini whinnie here


Now get your necklace change and your wire. Feed your wire through the centre of the chain and wind it around itself.

Alternative option: If you want the horse to be loose on the chain add a small jump ring onto the chain and wrap your wire around this instead.


Cover the wrapping by adding a little bead, I've gone for this cute wooden one


Now get the ends of your wire and wrap them around your model. Secure them by using pliers to tie them in a knot under the model.


You now have a cute little model horse necklace!


Advanced Option

For the advanced option you will need either a dremel or a small hand drill. Use this to make a hole in the withers of your model.

Now fill this hole with superglue and insert a sheep eye nail into the hole. Leave it there to set.

Now you can add a jump ring through the sheep eye and feed your necklace chain through it.


This same method can be used to create all kinds of jewellery and ornaments, including earrings! Enjoy :D

Monday, 9 January 2023

Evaluating Your Collection

 It's a new year and with a new year comes a bit of a stock take. I do think it's important at times to go over what you own and start to think about where there are gaps and where your focus should be for the next year. This is particularly true if, like me, you're a regular shower who doesn't really have any specialism and just likes to have all the pretty things!

The main focus of this post is going to be evaluating your collection with regards to having a well balanced show string, but this can be used in lots of other ways too :)

So here is my guide to start evaluating your collection.

Step 1: Cataloguing

If you haven't catalogued your collection then this is your cue to start. You need to catalogue your collection from day one. On a very basic level if your house burns down and you don't know what you have you won't be able to claim on the insurance, so please catalogue!

There are tonnes of different ways you can go about doing this (and I've already written loads of tutorials on it) but here are the three main ways:

1. Paper catalogue
2. Spreadsheet
3. Specialist software

Some people do still like to do a paper catalogue, either in a binder, notebook or one of the specialist model horse cataloguing planners. This is a lovely way to do it and looks beautiful but it can be time consuming, it is also not much help if it burns with your house (you should have a fire proof box in your house where you can keep important documents, if you are paper cataloguing and don't have one, get one).

A spreadsheet (either excel, sheets or similar) is probably the most popular option. I've done a tutorial on it here

Finally you can use specialist software. There are a variety of different programmes out there designed to do this. The two I've used are MyModelHorse Database and OMHPS (this is a photoshowing database but can also be used for cataloguing if you have less than 2,000 models). I did also use one years ago that came on an actual disk (so vintage) but I cannot remember the name of it!

Once you have your models catalogued you can move on to data collection.

Step 2: Know what you've got

Now you need to know what you've got. There are various ways to do this but this is my super duper not technical simple method.

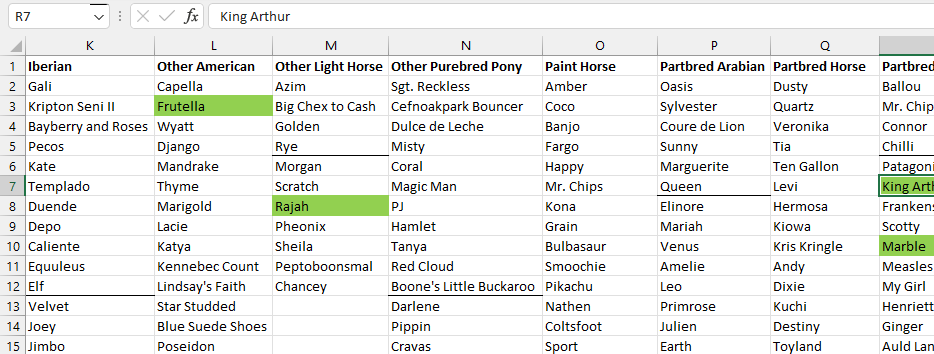
I use a blank excel spreadsheet. Along the bottom are tabs for different finishes. On each sheet is a column for the different show classes like so:


Underneath each one is a list of all the horses that go into that class. That way I can clearly see who I have for each class. I also use this to help pick horses for showing. You can also use filters on your actual catalogue to help with this.

As an aside the green squares are BMECS qualified horses for 23/24/25.

Step 3: Where are the gaps?

Now the next question is, where are the gaps. Above is an extract from my OF sheet. Not many gaps there. Now take a look at ARC:


Immediately you'll note that some columns aren't even there. I don't own a single ARC Paint Horse for example. You can also see some have WAY MORE horses than others. It is really no surprise that I own thousands of fantasy/decorators and then hardly any realistic models.

Seeing where I have gaps can help me to think about what I might want to focus on creating for the next year. This is especially useful if you have like 100 blank resins *maybe more cough*. So in terms of my painting for this year I am definitely going to increase my stock horses and I could also do with a few more British Native. I should probably not paint anymore fantasy or decorator models for a while!

Step 4: Where can you make cuts (if you want to)?

This step is totally optional. But if you do want to cut down your collection you could start by making cuts where you simply have too many horses to realistically ever show. Using this spreadsheet I can see that I have 156 OF Fantasy/Decorator horses. The reality is it would take years for me to show them all so most never go out. If I want to make cuts this is probably the best place to do it (I won't though, you can prise my decorators out of my cold dead hands).

Step 5: Where could you introduce new blood

The final step is to think about where new blood could be introduced. It may be that yes you have ten very nice CM Arabians, but actually they are all 10 years old and don't really do much anymore. Maybe, looking at that, a focus for this year could be adding some new ones. If you also cross reference with your workmanship tab you could focus down even more by trying to fill gaps in colour as well as breed.

So there we go! Collecting evaluated and stock take done. Now to start planning some shopping for the new year :D

Wednesday, 4 January 2023

Show String Rankings: How To

 When you've been showing for years it often becomes hard to identify which are your best and worst models. Sometimes you probably feel like you take the same models to every show and although you feel like they are your best they aren't actually doing as well as you would like.

So today I'm going to share with you a quick and easy way to rank your horses and get a good picture of who is still succeeding and who is falling short. All you will need is MS Excel (or similar) and a bit of time and patience.

Scoring System

The first step is to create your own scoring system. You will need to allocate a number of points to each of the different awards your models can win. How many points you award is up to you but it needs to be consistent.

My points system is below: 

Overall Champion = 100
Overall Reserve Champion = 85
Overall Reserve To Reserve Champion = 70

Section Champion = 50
Section Reserve Champion = 40
Section Reserve to Reserve Champion = 30

Top 10 = 25

Champion = 20
Reserve Champion = 15
Reserve To Reserve Champion = 10

Best of Breed/Group Winner = 8

1st Place = 6
2nd Place = 5
3rd Place = 4
4th Place = 3
5th Place = 2
6th Place = 1

I also double my points for BMECS/NAN placings.

Now you have a scoring system in place you are ready to start your spreadsheet and start ranking.

Setting Up Your Spreadsheet

Set up a spreadsheet with columns as follows:

1. Horse's Name
2. Points
3. Show's Attended
4. Average


To work out the average points you will need to enter the following formula into D2


Now you can go about populating your spreadsheet. This is going to be extremely time consuming if you have been showing for years and just starting out so maybe try to aim for a year a week or something similar!

Start by recording the total points for every horses in Column B

Next go back over your show lists and record the total numbers of shows each horse has attended in Column C

Important Note: Even if a horse has zero points if they have attended a show you will still need to make a note of this.

You should notice that column D automatically populates with the average points.

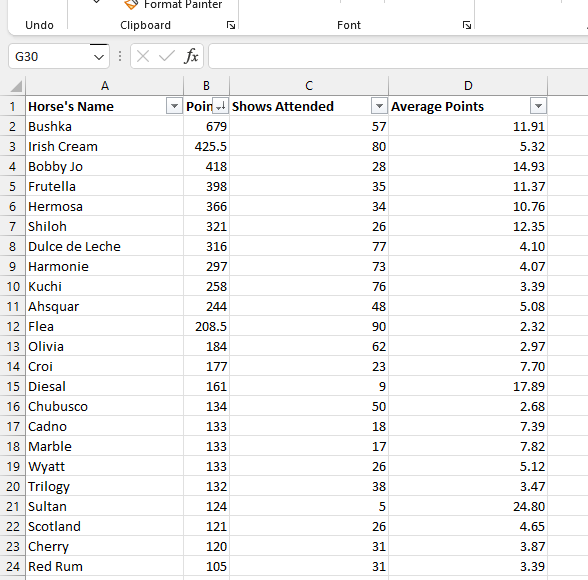
You should end up with something like this:


I have applied filters to make organising easier! You can do this under the 'Data' tab.

Sorting Your Horses

You can now sort your horses by two main methods either their total points or their average points. To illustrate the difference between the two look at the list of my top OF horses. The first is sorted by total points:


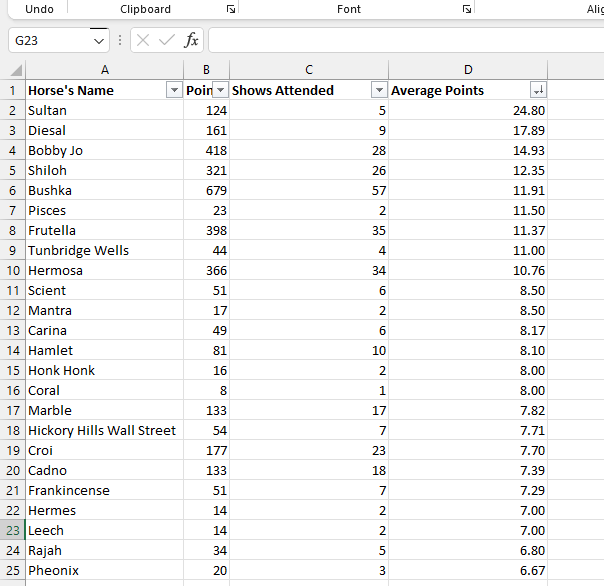
And the second is sorted by average points:


You will see the two lists are very different. One of the reasons you want to use average points over total points to see your top horses is that if you have a model that you have been showing for years (like Bushka for example) they will have a LOT of points and it will be hard for newer models (like Sultan for example) to make their way onto the list. Look at how many shows Bushka has attended compared to Sultan! Using average points therefore allows you to ensure that new horses that are doing well fit into your show string and old horses that maybe did well in the past but haven't placed in years drop out.

Final Tips

The final thing I would say is try to split by finish, that way you know your best horses for each finish:


I have also started linking these into my Massive Horse Spreadsheet. This means that I can sort by things such as make, scale and breed to tell you who my best OF Arabian or best CM Thoroughbred is. This is really helpful when it comes to specialist shows.

Sunday, 3 May 2020

Seminar #4 - An Introduction to Airbrushing

I can't believe we are already on seminar number 4! I am going to have to add more to the calendar (and I know I still need to add a proper page to the website)!

Seminar number four is going to be an introduction to airbrushing. We are going to go through all the basics of airbrushing, take an airbrush apart to look at all the different parts, discuss cleaning, troubleshooting, paints and actually put some paint on a model horse!

If you've never airbrushed before and always wanted to try then this is a great video for you :) It is also really good if you do airbrush as you might pick up some tips and tricks or you might see how useless I can be at times! We'll take apart and clean my really horrible clogged airbrush so that will be fun!

The Important Info

Date: 8th May 2020

Time: 15:00 BST (UK Time)


You can have a go at the same time and follow along when we paint a model or you can just watch! Entirely up to you :)


An example of an airbrushed custom model horse.

Tuesday, 27 November 2018

Having a Go At Making Show Ribbons

So whilst on my tours of the internet I came across this Blog post by Braymere Custom Saddlery: http://braymere.blogspot.com/2012/08/how-to-make-show-ribbons.html

And I though "I could do that"

So of course I decided to attempt it, I mean how hard could it be?

OK so first step...ribbon. I can do that! I chose green, gold and red, mainly because those were the first three colours I took out of the pot!


So for the next step I need to cut a circle out of card, they used a pen top, but I have these handy stencils! I didn't have any white card so yellow it is...


Right time to cut cut cut! The next step was to cut 8 small pieces of ribbon and then three longer bits. So far so good!

Now it was time to stick. Now we have a bit of a problem. When all my stuff was stored over the summer all my glue basically dried up, so it is a complete nightmare to work with! It's all horrible and messy and stringy. I really need to get some more.

But we got there, here are eight stunning glued pieces.


I probably made them a bit too large, so mine won't look as tight and neat. But o well, worse things happen at sea.

Time to stick the first four down, look at my pretty flower thing!


Now for the other four, as you can see I couldn't just be simple and use the same colour so I used gold and red instead. It isn't as circular as it should be. But it doesn't look awful from the front!


Now to stick the three longer pieces on. I put the green in the middle and then the red and gold either side. Look how messy my glue is!


Finally it was onto the centre piece. The Blog post recommended decapitating horse sprinkles, I do not have horse sprinkles. So I raided my stickers draw and found these clear gems that were the perfect size. So I peeled one off and stuck it in the middle!


Finally I added the little paper hook and voila! We have a little rosette. I don't think it looks too awful for a first attempt. Tack making horse seems to like it anyway.


With the flash, urgh look at that glue! OK I'm going to go and order some glue now...


If you had a go at this tutorial let me know and share your attempts! I'm sure they are a lot better than mine! Although I'm already thinking about making thousands to give out as awards at my next live show...someone should probably stop me from doing that...


This blog post was written by Catriona Harris, owner of Chestnut Ridge and model horse fanatic.