The Colour
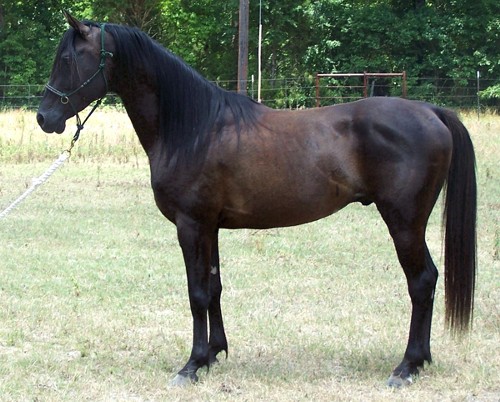
'Faded black' is an expression to describe black horses whose coats appear to have faded into a ginger colour. There has been some suggestion of a genetic element to this but nobody is really sure.
Anyway reference picture:
You Will Need
- Prepped Stablemate Body
- Light Orange Paint
- Dark Orange Paint
- Sand Coloured Paint
- Black Paint
- White Paint
- Light Grey Paint
- Dark Grey Paint
- Brown Paint
- Red Paint
- Earth/Stone Coloured Paint
- Dark Red Paint
- Sealant
- Gloss
First we are going to mix some dark and light orange (equal parts) with a little bit of sand coloured paint to dull it down.

Cover the whole horse, you will need to cover the tail as well but if you are using this to hold him you may need to do a second layer like I have had to!

Step 2
We are now going to build up the layers of black. My amazing photoshopping skills will show you where to paint!
You need to build up the black in thin layers, this will allow the ginger to shine through in the relevant places.
First we do the legs and back:

Then we go over those areas again but also do the quarters, withers, neck and face as well as starting on the mane and tail

Now we cover the whole horse apart from the barrel and very tips of the mane and tail:

And finally we cover everything!

Your horse should now look a bit like this:

We are now going to work on the details.
THE EYES
Step 1
As the horse is already black we don't need to do the first black layer. So let's start with the whites. We do a layer of white and then add a little bit of red and mix it in.

Step 2
Now do the iris using a brown paint (you can mix in a bit of gold if you like). Leave a small bit of the white showing in the corner of the eye.

Step 3
The pupil can be done in black paint. Remember a horses pupil is an oblong shape not a round one like a humans.

THE HOOVES
Step 1
Put a layer of light grey paint on all of the horses hooves.

Step 2
Now do a layer of dark grey paint leaving a small strip of the light grey visible at the top of the hoof.

OTHER DETAILS
Step 1
Use a stone coloured paint to create the chestnuts. Look at reference for exact positioning but on a basic level they go above the knee on the front legs and below on the back legs.

Step 2
Use a dark red paint to fill the nostrils.

White Markings
My horse doesn't have any white markings but you can build these up using layers of white paint. Remember where they have white markings on their legs you will need to do light coloured hooves.
Your horse should now be complete! Take a look at my little Arab and don't forget to post your completed horses below.

No comments:
Post a Comment